Category Archives: Fall

THE Perfect Holiday Treat : Apple Zeppoles

I am so excited to share these with you.  Good things are even better when shared, right?  These little babies are so, SO yummy!

I think if my blog ends up being good and useful for one thing, I’d hope that it’s this recipe that gets put to use!

I made these Apple Zeppoles at work this last fall, and now over this holiday season I’ve made them (big batches) two weekends in a row.  Last weekend I cooked up more than 50 for a holiday get together with some friends, and they were a huge, HUGE hit!  Everyone really loves them.  Not to mention my husband who said, as I was cooking all these up and he had a couple, “Maybe we shouldn’t go anywhere…  We could just stay home and eat these.”  Ha!  Good suggestion, honey.  😉  So this weekend we had some friends over for a little dinner, and I had to make them again, of course.

Zeppoles are an Italian dessert like a small fritter or doughnut, and are made with a Pâte à Choux dough.  This pastry dough can be made sweet for lovely treats like profiteroles, or cream puffs, eclairs, beignets, or zeppoles; or it can be made savory for something like cheese popovers.

I started making choux pastry several years ago while working in restaurants, always using it to bake into profiteroles.  But over this past fall season I was having fun using apples in new yummy ways, and I realized how versatile this dough is and what an amazing little zeppole treat it can be turned into.

They’re so comforting and perfect for this time of year, all warm, soft and airy on the inside, with the outside all crisp and rolled in cinnamon and sugar.  If you haven’t made these before, or any choux pastry, don’t shy away!  It is really easy.  Frying up a big batch of the Apple Zeppoles does take a little time, but trust me it is very well worth it!

This slideshow requires JavaScript.

::Apple Zeppoles::
(Adapted and modified from Giada’s Apple Zeppole)

  • 4-5 apples, or 3 c. peeled and grated apples, Granny Smiths work well
  • 1/2 c. sugar
  • 1/2 c. unsalted butter
  • 1 c. water
  • 1/2 t. salt
  • 2 c. AP flour
  • 8 eggs
  • Canola Oil for frying, can combine a little olive oil and/or vegetable oil with it
  • 1 1/2 c. sugar + 1-2 T cinnamon combined in a pie dish

In a large saucepan or deep frying pan, pour in the oil(s) to 2-3 inches deep.  Use a candy thermometer and heat the oil to 360 deg F over medium heat.  Crack all eggs into a bowl and set aside.  Grate all peeled and cored apples (food processor is quick).  I squeeze out the liquid in the grated apple by handfuls as I move it all to a bowl.  You can stir in a little lemon juice and set aside.

For pate choux: In a med/large saucepan, combine the sugar, butter, water, and salt and heat until it’s all melted and starts to boil.  Once it reaches a boil, take off heat and stir in two c. flour with a wooden spoon or rubber spatula.  Keep stirring, set back on hot burner, for 2-ish minutes until the dough forms a ball and is all clumped together.

Transfer the mixture into the bowl of your stand mixer and using the paddle, turn on medium speed and add in the eggs one by one.  Incorporate each egg completely before adding the next.  Beat until smooth and slowly stir in the grated apples.

Set out a baking sheet with paper towels on it, have a soft-tipped tongs or a ‘spider’ ready to use.  Once the oil reaches 350 – 360 deg F, drop in spoonfuls of dough, about 1-2 T each, using a small cookie scooper or a tablespoon.  You want them about 2″ around once cooked.  They will drop to the bottom of the pan and pop back up.  I let each one pop up to the surface before adding the next.  Work in batches so not to over crowd the pan.  Let cook for about 2 minutes then flip over for another 2 min., using the nylon-tipped tongs or the spider.  They will puff up and be very golden brown when done, remove and lay onto paper towel lined baking sheet.  Roll them in the cinnamon + sugar while still warm.  Move them to a serving platter or baking dish and enjoy!

Notes:  Monitor the oil temperature while cooking, it will drop once all the dough is added in so you can turn the heat up a bit while they’re cooking.  If you want to cook up the remaining batter later, the oil can be cooled and set aside (covered) and the batter can be covered with plastic wrap and set in the fridge and used within four or five days.

So the method part is a little long-winded, but don’t run away from this thinking they’re too much work!!  I so hope you make these, you (along with your friends and family) will be glad you did.  =)

And if you so desire, make up some delicious whip cream to complete them:

::Cinnamon Whipped Cream::

1 to 1 1/2 c. whipping cream
3-4 T powdered sugar
1 t. vanilla
1-2 t cinnamon (optional: cardamom, nutmeg, allspice, ginger.. they’re all good here)

In a stand mixer fitted with the whisk, whip the cream to medium-stiff peaks.  Halfway through add in the powdered sugar, vanilla and cinnamon spices.  Set in a bowl and enjoy immediately or set in fridge for later.

Enjoy!  And I hope you’re having a lovely week-before-Christmas.  =)

Fall Canning: Apple Butter

Okay, NOW I think I’m done canning for the year.  I finished processing all of the thirty pounds of apples I got, and after doing two rounds of Applesauce, I cooked up a huge pot of Apple Butter and canned it all.  Ended up getting seven half-pints and two pint jars.

I’m so excited about this one, it was my first time doing a fruit butter.  It is so, SO yummy!  It cooks down and the sugars caramelize, the fruit butter gets very rich, thick, smooth, and a beautiful pinkish-golden color.  I could eat it in bowl-fulls spoonfuls.  🙂  It’s just a cinnamon-y taste of the Holidays that are just around the corner.  Seriously, when you have a spoonful you immediately think Thanksgiving and Christmas.

Now that I’ve canned pickled stuff: Pickled Beets, Dilly Beans, Dill Pickles, Cinnamon Applesauce, jam, jelly, and now finally fruit butter, I totally think that if I was only able to can one thing for the rest of my life, it would be this.  Mostly because I can’t get enough and you could incorporate it into some holiday baking, but also because it’s so easy to make and preserve.  Once it’s all in the pot, you just let it cook down, stirring occasionally and let it go for about two to three hours.  Since it’s all thick and sugary it stays very hot, so you don’t have to worry about the mixture cooling down too much before you get it in the jars and then get them sealed and in the water bath.

It’s so easy, so rich, flavorful, delicious, festive, and so worth making.  Even if you’re not canning, make a pot of it on the stovetop or crock pot, fill into a couple jars and they stay good refrigerated for up to two months!

I spread the Apple Butter on these crackers– the Organic Stoneground Wheat crackers- with cream cheese and it’s the perfect snack.  I did this last night and my husband was surprised how good they were, he kept coming back for more.  We thought they were like little bites of Apple Pie or Apple Turnovers.  =)

::Apple Butter::

8-9 lbs apples, peeled, cored, chopped
Juice of 2 lemons
3 c. apple cider
3 c. sugar
1-2 t. ground cinnamon
1/2 t. cloves

Place all chopped apples in a large non-reactive saucepan or dutch oven with the lemon juice and cider, and 1 c. water.  Bring to a boil and then reduce to low, cover and simmer for about 30-40 min. until soft.

Move pot off of heat and puree with an immersion hand blender (or transfer it into a food processor in batches) until apple mixture is smooth.  Place back onto heat and add the sugar and spices.  Cook uncovered for about 1 1/2 to 2 1/2 hours over medium-low heat until the apple butter has reduced quite a bit, is thick and mounds on a spoon.  Stir often.

Fill hot, sterilized half-pint jars and leave 1/4″ headspace, remove air bubbles, wipe rims clean and seal the jars with the lids and rings, semi-tight.  Process the jars in boiling water bath for 10 min. (add 1 min. for every 1k’ elevation, I processed mine for 13-14 min.).  Store in a cool dry place for up to a year, if you can let it last that long!  Open jars are good refrigerated for up to two months.

Pumpkin Chocolate Chip Cookies

The chilly weather and changing seasons have really got me nesting and wanting to do a lot of cooking and baking, especially with chickens, apples and pumpkins.  So my mental ‘To Make’ list, and my Queue, has been getting bigger everyday.  My blogging does go through dry spells, but not now.  You’re going to see a lot of those seasonal goodies here for a little while.

I have several different Fall/early Winter desserts up my sleeve to make at work this month, and some to make at home.  I plan on posting some of my restaurant desserts so stay tuned for those yummy recipes!

I’m a little obsessed with pumpkin-y foods right now and have been on a quest to figure out a perfect recipe for Pumpkin Chocolate Chip Cookies.  (I just realized that my blog has not had any cookies appear on it thus far.  What’s up with that??  After this post on cookies, this blog can officially have my name authoring it).

I first tried out this recipe.  It wasn’t great, a little too cake-y.  I want it to be like my chocolate chip cookies would be, but with pumpkin flavor.  So then I tried this one from Dishing the Divine, and modified it a little.  It’s really good.  Better than the first, not too cake-y and lots of pumpkin flavor.  I’m going to make them again soon, adjusting a couple things slightly again, hopefully to end up with exactly what I’m wanting. =)  So here’s my version, modified from the Dishing the Divine recipe.

::Pumpkin Chocolate Chip Cookies::

6 oz unsalted butter, softened
3/4 c. sugar
1/3 c. brown sugar
1 egg
1 t. vanilla
1 c. pumpkin puree

2 c. AP flour
1 t. baking soda
1/2 t. salt
1 t. cinnamon
8 oz chocolate chips

Preheat oven to 350 F.
In a mixing bowl, add all dry ingredients and stir to combine.
Use the creaming method: In a stand mixer, beat softened butter ’til creamy, slowly add the sugars and beat until creamy and a little fluffy.  Mix in egg, vanilla, then pumpkin puree (I had set my puree in a fine mesh sieve to drain a little liquid).
In two batches, gently stir/fold in the dry ingredients with a spatula, incorporate the chocolate chips in with the last half of the dry mix.  Don’t over mix.
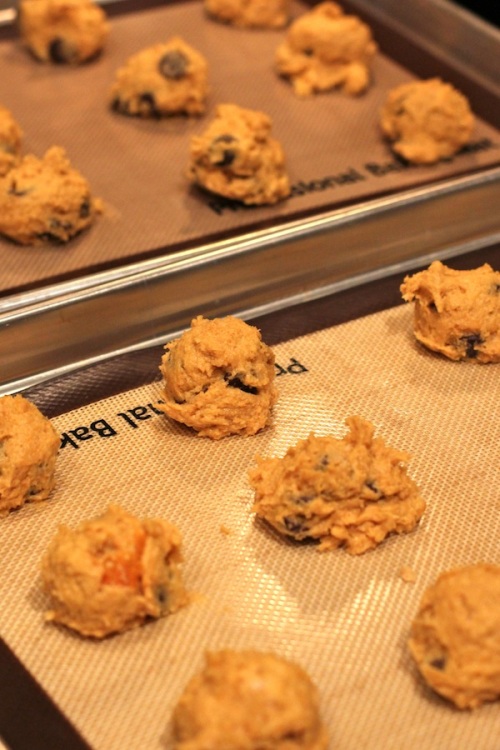
Drop spoonfuls of dough onto a baking sheet prepared with butter, parchment paper, or a Silpat.  Bake for 15-ish min., I recommend baking until they’re a deep golden brown, a little darker than what you’d let your regular choc chip cookies get, otherwise these can end up a little too moist.

Even though I have been baking little pie pumpkins and freezing the puree, I used canned puree for these.  I’ll try them again later with the real stuff and see the difference.

If you try these, let me know how you like ’em!  I’m off to go bring some to my hubby, with a tall glass of milk of course.. he’s on the couch watching football. =)

Enjoy 🙂

Fall Canning: Cinnamon Applesauce


Just when I thought I was done canning for the season, I managed to round up 30-some lbs of apples off of a friend’s tree.  As it’s late in the season, they’re not the most crisp, juicy, or sweet apples, but they’re definitely good enough to make Applesauce and Apple Butter with!

I did two batches of applesauce, and got 8 pints from about 20 lbs of apples.  Now I have a lot left still to make one or two batches of Apple Butter!

It will be really nice to be able to pull out a jar of homemade Applesauce this winter to have with some dinners.

I used my favorite book on preserving, Williams-Sonoma Art of Preserving that I’ve mentioned on previous posts.  Making and canning Applesauce is pretty simple, it’s totally my kind of canning project.  =)

::Homemade Applesauce::
(adapted from The Art of Preserving, adjusted to my liking, to yield 4 pint jars) 

1/2 – 3/4 c. fresh lemon juice
10-12 lbs apples (varieties like MacIntosh or Pink Lady are great)
1/2 – 3/4 c. sugar
1 1/2 T ground cinnamon, if using

Place fresh lemon juice in a large non-reactive saucepan, then add in all the chopped/cored apples.  Stir to coat with lemon juice, add in a little water if needed so they don’t stick to bottom of pan while cooking.  Stir in the sugar and cover.  Heat over high to bring to a boil, then lower to simmer for about 20 min., stirring often, til apples are tender.  Remove lid and simmer a few more minutes.
Use a food mill or course sieve set over a large bowl and push softened apples through, then add the smooth apple mixture back to the pan.  Cook on medium for about 5 min. until hot.  It will thicken during cooking, add in a little water to adjust consistency if desired, and take into account that the applesauce will thicken a little during the processing.

Have hot, sterilized jars ready to be filled.  Have lids setting in a small pot, pour in hot water from the tea pot, you can keep these lids over low heat until you seal the jars.

When the applesauce is simmering and very hot, ladle into jars, leaving 1/4″ headspace.  Remove any air bubbles/big air pockets in jar, adjust headspace, wipe rims of jar, place warm lid on jar, then twist the ring on to seal somewhat tight.

Process the jars for 20 minutes.  Adjust processing time for higher altitude, + 1 min. for every 1k’ elevation.  Remove jars from water bath, leave undisturbed in a cool dry place.  Test seals the next day.  Enjoy within a year.

Some of you may think, “why go to so much work just for applesauce??”.  Well, it makes the house smell so yummy, and there’s just something great about pulling out jars of summer/Fall produce from your pantry on the cold days of winter.  It’s good experience too, now I have applesauce under my belt.  And why would I want all those apples on my friend’s tree to go to be left and not turned into something yummy?  =)

Even if you don’t do any canning, this is a great thing to make at home with a bunch of apples, so easy and very worth it.  And now there’s Apple Butter to be made and preserved!

Chicken Tortilla Soup

From the way I’ve been cooking lately and having chicken recipes on the blog, you’d probably think it’s the only meat we eat around here.  Really it’s not!  And it’s about to be changed up a bit soon, as we’re about to get our half of a Beef next week in our freezer!!  I’ll talk more about that later when we get it and will be cooking up some fun dinners with ALL of that hundred-something pounds of beef!  But for now, I’ve been on a roll with my chicken stock and just made one of our favorite soups with it a couple days ago.  It may be our absolute, all-time favorite soup, but is it even possible to have one favorite??

I made this Chicken Tortilla Soup last winter when I was getting over a cold and just wanted a chicken broth/soup that was warm, comforting, and had a little bit of heat and spice to it.  So I brewed up the idea in my head, wrote down all the ingredients I wanted in it, and then cooked it up how I thought would be best.

Turned out that hubby and I loved it!  Then a friend came over and I dished him up a bowl and received one of the best compliments. He said something like, “I feel like I’m at a nice restaurant, and should be wearing a tie or something”.  I was so happy to hear that.  It is everything you would want from a soup and more.  Warm, comforting, soothing, with a bit of heat, so flavorful, all in a chicken broth that is thickened just slightly with a little flour sprinkled on the meat during the sautéing.  It has all the textures you’d want, with the chicken, beans, etc. to sink your teeth into, and the crunch from the tortilla chips.

This time I decided to go all out, I made a pot of Chicken Stock, got the strained stock in a pot to stay warm on the stove, then in the stock pot made the soup with the meat that I pulled off the bones halfway through simmering the stock.  You can definitely make this with store-bought stock and one or two chicken breasts, which is how I did it the first time.  It’s wonderful both ways.  But whatever you do, just make it!!!  If you do use stock and meat from the store or just pulled out of your freezer, it is a quick one to cook up since most of the ingredients are canned and you don’t have to chop, slice, and dice a ton of produce to prep for it.

::Chicken Tortilla Soup::

1 yellow onion, chopped
4-5 garlic cloves, minced
2-3 jalepeno or serrano peppers, minced
2 c. (~ 1/2 to 1 lb) cooked chicken, cubed or shredded
2 t. chili powder
1-2 t. cumin
pinch of s+p
3 T. AP flour
1 (28 oz) can diced tomatoes
1/4 c. enchilada sauce, medium or hot (adjust for your taste)
4-5 quarts chicken stock/broth
1 (14.5 oz) can black beans, drained
1 (14.5 oz) can pinto beans, drained
1 (4 oz) can diced green chilies, drained
handful cilantro and/or parsley, chopped
handful cheddar cheese, grated
1 c. frozen corn

Garnish:
tortilla chips (a must!)
cheddar cheese, grated
green onions, sliced

[If chicken is not cooked yet, cut a couple breasts into cubes, heat olive oil in large soup pot and saute chicken just until cooked.  Set aside in a bowl and return empty pot to stove.]  Heat 3-4 T olive oil in large soup pot over med.-high heat and saute onion until translucent.  Add in garlic and jalapeno and let cook a couple minutes.  Stir in cooked chicken, sprinkle in the cumin, chili powder, and s+p and stir it up.  Sprinkle the 3-ish T flour onto the chicken, stir and cook 3-5 minutes to cook out the raw flour taste.  Pour in diced tomatoes, enchilada sauce, and chicken stock, stir and let it heat up to a simmer.  Pour all the beans in a colander, drain and rinse, add the diced green chilies, then stir it all into the soup.  Add in the frozen corn, a handful of grated cheddar, and cilantro.  Salt and pepper to taste, and adjust the level of heat to your preference, adding a bit more minced jalapeno or a pinch of red pepper flakes for a little more kick.  If you have kids or don’t like much heat, just omit all of the peppers.

{For an even more nourishing soup, if you plan ahead, soak the beans overnight.  Set 1 c. each of black and pinto beans in a bowl, cover with warm water and 2 T. lemon juice.  Leave on kitchen counter for 12-24 hrs.  Drain, rinse, place in a pot and fill pot with water.  Bring to a boil, skim off foam, and let simmer, covered, for 2-ish hours.  Then drain and use in soup.}

To serve, dish up into bowls and sprinkle with green onions, cheese, and crush tortilla chips on top.  YUMMMYYY!!  Enjoy!

It’s a perfect dinner now that it’s chilly outside.  And it’s even better the second night, as the flavors marry in the fridge overnight.  Or, as my husband likes to say, “The flavors were naughty overnight”.  =)

Yellowstone NP, Grand Teton NP, and Jackson Hole

My husband, our doggie Jackson, and I took a week and a half road trip earlier this month through Yellowstone National Park, to Grand Teton National Park, and Jackson Hole, WY.  It was such a good time and we saw a lot of country during this lovely Fall season.

I got to have a lot of fun with my camera, so wanted to show you some favorites from the trip (there’s a lot of them).  I posted them on my Facebook page but wanted to share and journal them here too.  =)

All of the photos were taken in YNP, Mesa Falls in Idaho, GTNP, and Jackson Hole, WY.


Stocking up on Chicken Stock

Well the beauty and chill of Fall came and set in so quickly, and it feels like winter is just around the corner.  Even though it’s getting colder and darker every day, I have been thoroughly enjoying Fall this year.  The changing weather and colors are so inspiring to be knitting up something wooly and warm, and cooking up something warm and comforting in the evening.

I love making lots of soup this time of year, and always need so much stock for it.  I used to load up on chicken stock from Costco, when they had the Pacific Natural Foods organic chicken broth which came in a box of 6 quart-size cartons, and at a great price.  Costco just quit carrying that and switched to the Kirkland stock, which I don’t trust so much to be so natural and organic.  So I decided to start making my own.  In the last two weeks I’ve made two pots of Chicken Stock and am working on stocking up a lot of it.  =)

One of my favorite things is having homemade soups and stocks in the freezer all winter.  It’s so great to pull out on those cold nights when you don’t feel like cooking but just want something homemade and warm.

I buy whole local Hutterite chickens at the grocery store here, and usually get 2-3 at a time so I always have some on hand.  It’s less than $2/lb this way, and so nice to know where it comes from.


::Homemade Chicken Stock::

(Note: Use one whole chicken (neck and other giblets optional), or if you have a few carcasses and bones, roast them at 350 F. for 30-40 min., then use in stock.  Also can cut the whole chicken in pieces and then set in pot if you’d like to enhance the amount of nutrients and gelatin in the broth.  On thawing: I take the bird out of the freezer, set it in my sink full of cold water, it thaws quickly.  Rough chop all vegetables, and use with or without the peelings.)

1 (4-5 lb.) roasting chicken
1 large yellow onion
1 head of garlic, cut in half crosswise
3-4 carrots
3-4 stalks celery
3-4 sprigs each of fresh rosemary, thyme, and/or parsley
2 bay leaves
1-2 t. black peppercorns
1 T. kosher salt

Rinse the chicken and set in stockpot, whole or cut into pieces.  Toss in the remaining ingredients and cover with 7-8 quarts of cold water.  Bring to a boil on high heat, once it reaches a boil reduce to med.-low so you maintain a gentle simmer.  Skim off the foam/scum off the top often during the first hour and a half of cooking.  Simmer uncovered 4 hours, adding a little hot water as needed to keep everything submerged.

Halfway through the cook time, you can remove the chicken with a tongs from the pot onto a cutting board.  Let it cool enough to touch and peel off all the meat and use this later in soup, pizza, burritos, etc.  Return the carcass and bones back to the pot and finish cooking.

Strain stock through a fine mesh strainer into another large stockpot or heatproof bowl and discard all of the solids.  Cool immediately in an ice bath or fridge, store in fridge for up to 3 days, or pack in containers and freeze for up to 3 months.

So far I've got about ten containers like this stocked up =)

Here are a couple more good posts on chicken stock, from The Nourishing Cook and Nourished Kitchen.

At the restaurant I work at, the chef cuts all the whole Sage Creek chickens into the pieces he needs for one of his dinner entrees, then sets all the carcasses on a large baking sheet and roasts them for 40-ish minutes.  Then sets them in a large stockpot and makes stock with the roasted bones.  Whether you do it that way or with it whole, meat and all, it’s bound to be delicious, good for you, and so rewarding.  …And make the whole house smell wonderful!

Enjoy!!